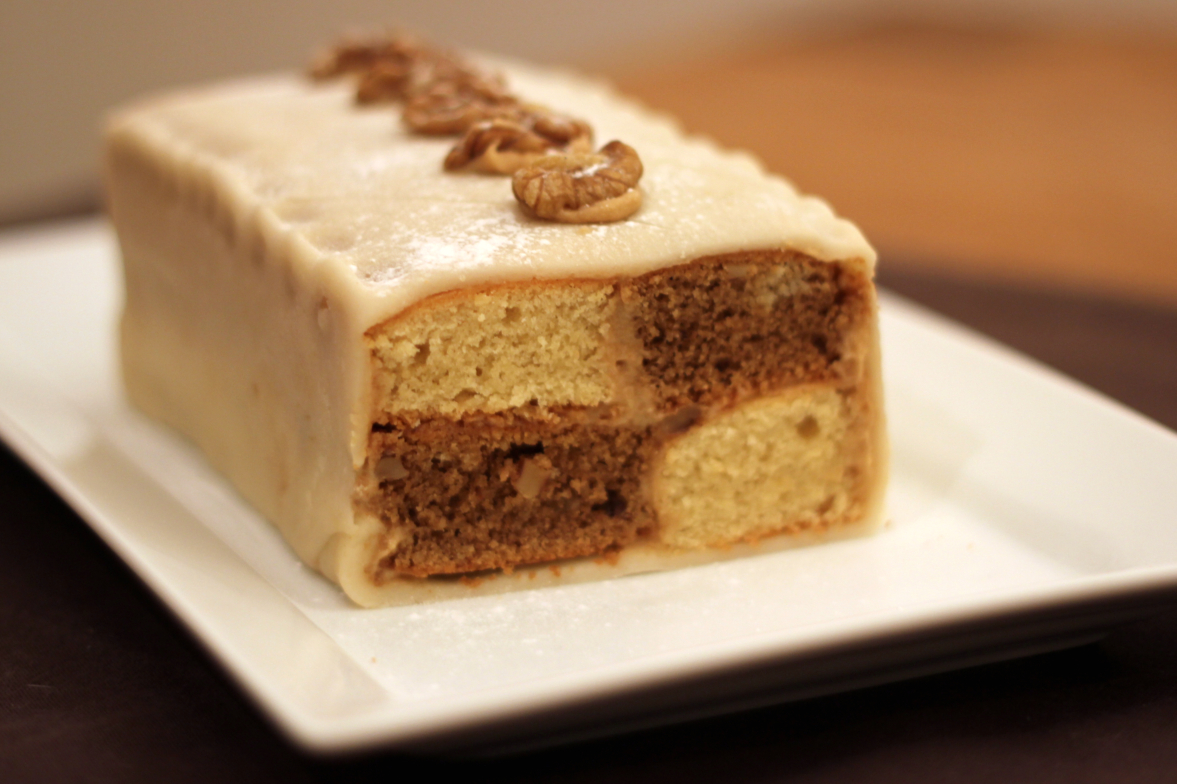
Mandy’s coffee and walnut Battenburg
Sunday 19th May 2013 sees bakers from around the world taking part in World Baking Day and this year’s World Baking Day message is: ‘Bake brave, step out of your comfort zone and bake a cake that will push your baking skills to the limit’ – so we have, with a Battenburg!
As I enjoy a challenge and love baking, I thought I would roll up my sleeves, put my apron on and take part in this year’s World Baking Day.
With the words ‘bake brave’ ringing in my ears, wondering what to bake was a challenge. As I armed myself with an abundance of cook books for inspiration, I started to reminisce about my favourite cakes and bakes as a child.
Looking back over the years, one of my favourite indulgent treats as a child was the all time classic Battenburg, often gifted to me when visiting my nan. Fond memories presented themselves of separating the cake into its individual colour parts and enjoying the distinctive taste of marzipan. With this in mind, no more consideration was needed. I had the perfect cake to bake.
Interesting fact – The original pink and white Battenburg cake was made to honour the marriage of Queen Victoria’s granddaughter to Prince Louis of Battenberg in 1884.
As I wanted to add a twist and at the same time be a little creative, my Battenburg has become a less familiar coffee and walnut Battenburg, made especially for this year’s World Baking Day. Many thanks to Mary Berry for the inspiration and recipe!
And so my baking task began ……
Ingredients.
For the cake
- 100g margarine
- 100g caster sugar
- 2 eggs
- 100g self-raising flour
- ½ tsp baking powder
- 50g ground almonds
- few drops vanilla extract
- 3 tsp milk
- 1½ tsp instant coffee powder
- 25g shelled walnuts, chopped
For the coffee butter icing
- 100g icing sugar
- 40g butter
- ½ tsp instant coffee powder
- 1½ tsp milk
To decorate the cake
- 225g white marzipan
- 5 small walnut pieces
Method
- For the cake, preheat the oven to 170C. Grease the bottom and sides of a 20cm square, cake tin.
- Cut out a piece of greaseproof paper that is 7.5cm longer than the length of the tin. Fold the paper in half widthways. Open out the paper and push up the centre fold to make a 4cm pleat. Line the base of the tin with this, making any adjustments to ensure the pleat runs down the centre of the tin making in effect two rectangular ‘tins’ within the tin.
- Beat the margarine, sugar, eggs, flour, baking powder and ground almonds in a large bowl for about 2-3 minutes, or until smooth, slightly lighter in colour and glossy looking. (If you put a damp cloth under the bowl, it stops it from moving around.)
- Spoon slightly more than half the mixture into a separate bowl and stir in the vanilla extract and 1½ teaspoons of the milk. Set aside.
- Mix the coffee in the remaining 1½ teaspoons of milk, stirring until it has dissolved (you don’t need to heat the milk), then stir this into the other bowl of mixture along with the chopped walnuts. Spoon the vanilla mixture into one half of the tin and the coffee-walnut mixture into the other half. Level the surface of each half with a knife. Check the paper divider is still straight and in the middle.
- Bake in the oven for 35-40 minutes or until the cake is well risen, springy to the touch and has shrunk slightly from the sides of the tin. Leave to cool in the tin for a few minutes, then loosen the cake from the sides with a round bladed knife, turn it out, peel off the parchment liner and finish cooling on a wire rack.
- For the butter icing, sift the icing sugar into a medium bowl. Add the butter. Mix the coffee and milk together until the coffee has dissolved, and pour into the bowl. Beat everything together with a wooden spoon until soft and smooth. Set aside.
- Trim the crispy outer edges off the cooled cake with a serrated knife, then cut and trim if necessary into 4 equal strips. Lay one vanilla and one coffee-walnut strip next to each other, then use a little of the butter icing to stick them together. Spread a bit more icing on the top. Stick the remaining two strips together with icing and place them on top to create a chequerboard effect.
- Spread a little more icing over the top of the assembled cake.
- Cut two pieces of string, one that is the length of the assembled cake and one that will wrap all around it.
- Roll the marzipan out, on a work surface lightly dusted with sifted icing sugar, into an oblong the length of the cake and sufficiently wide to wrap around the cake, using the pieces of string as your measuring guide.
- Lay the butter iced side of the cake on the marzipan, positioning it so that when you lift up one long side, it perfectly covers one side of the cake (this way the join will be neatly in the corner).
- Reserve a teaspoonful of the icing and spread the rest over the remaining three sides of the cake (not the ends). Brush off any crumbs from the marzipan and work surface. Roll the cake over in the marzipan, pressing to neatly cover it, then brush the corner join lightly with water, pressing it to seal. (Try to avoid touching the marzipan with wet fingers as they will mark it.) Turn the cake over so that the join is underneath. Trim a slim slice from each end of the cake to neaten and show off the chequerboard effect. Smooth the marzipan over with your hands so their warmth will give it a smooth finish.
- While the marzipan is still soft, crimp the edges by pinching the marzipan between your thumb and first finger at a slight angle and at regular intervals. Score the top of the cake with long diagonal lines using a sharp knife. Sift over some icing sugar to lightly dust the top, then lay the walnut pieces down the centre, securing with the reserved butter icing.


